Mother’s Day arrives on May 12th, and a specially crafted cake makes the perfect celebration.
The classic appeal of a Chocolate Bundt Cake beckons many bakers, while others prefer the elegant Fresh Cream and Pineapple creation with its cloud-soft vanilla sponge. Chef John’s Chocolate Decadence comes with 5-star ratings, and the quick-prep Strawberry-Rosé Snack Cake needs just 15 minutes of hands-on time. These options suit bakers of every skill level.
Creating the perfect Mother’s Day special cake might seem challenging at first. This detailed guide will help you craft a cake that makes Mom’s day truly memorable. We’ll show you how to select the right ingredients and become skilled at simple decorating techniques through each step of the process.
Ready to create something spectacular? Let’s take a closer look at the sweet world of Mother’s Day baking!
Planning Your Mother’s Day Cake
The journey to creating a memorable Mother’s Day cake begins with thoughtful planning. Taking time to consider your approach will ensure your cake becomes the highlight of her special day.
Understanding Mom’s Flavor Preferences
The golden rule of Mother’s Day baking is simple: choose flavors your mom loves, not what you prefer. Consider her taste preferences carefully—does she enjoy classic chocolate and vanilla, or does she appreciate more adventurous combinations? Including her favorite fruits, nuts, or spices adds a personal touch that shows genuine thoughtfulness. For instance, if she loves citrus, an Earl Gray-flavored loaf cake might delight her, while chocolate lovers might prefer a decadent German chocolate cake with coconut-pecan frosting.
Many popular Mother’s Day cake options include:
- Strawberry cakes with fresh spring berries
- Lemon-based cakes for brightness and zest
- Chocolate variations from simple Bundt cakes to triple-layer indulgences
- Carrot cake with cream cheese frosting for traditional appeal
Choosing Between Homemade and Store-Bought Options
While store-bought cakes offer convenience, homemade cakes provide significant advantages. Store-bought options often contain preservatives and chemicals that extend shelf life for weeks or months. According to research, these mass-produced cakes frequently use margarine instead of butter, dried egg powder rather than fresh eggs, and cake gels containing animal fats—even in supposedly “eggless” options.
Conversely, home-baked cakes contain no preservatives, use fresh ingredients, and can accommodate dietary restrictions or preferences. Additionally, the hygiene levels of home kitchens typically exceed commercial baking spaces. Nevertheless, if time constraints are significant, consider a hybrid approach—perhaps purchasing a simple base cake and adding homemade decorative elements.
Creating a Baking Timeline
Proper scheduling prevents last-minute stress and ensures a fresh, delicious result. Surprisingly, many cakes can be prepared well in advance—some loaf cakes can be made up to three months ahead and frozen unfrosted. For best results, consider this timeline:
Several days before: Gather ingredients and equipment to avoid day-of shortages.
Two days before: Bake cake layers and freeze them wrapped tightly to preserve moisture.
One day before: Prepare frostings and fillings, then assemble and frost the cake.
Morning of Mother’s Day: Add final decorative touches like fresh flowers or fruit garnishes.
This approach divides the work into manageable segments, allowing you to focus on quality at each stage rather than rushing through the entire process.
Essential Ingredients and Equipment
Your Mother’s Day cake journey starts with the right supplies. The quality of ingredients and tools shapes your final creation, so proper preparation matters.
Basic Cake Ingredients Every Baker Needs
Great cakes need simple yet quality ingredients. Flour builds the cake’s structure, and cake flour works best for Mother’s Day cakes because of its fine texture. Eggs are vital binders that boost texture and flavor—you’ll get better results with organic, free-range ones. Butter brings moisture and richness, while full-fat varieties give you fluffier cakes with finer crumbs. Sugar does more than sweeten—it stabilizes your batter and keeps moisture locked in. Caster sugar works best here.
Whole milk stands out as the top liquid choice. Its 3.5% fat content softens and moistens the cake beautifully. Vanilla makes a world of difference—pure extract outshines artificial essence with deeper, richer flavors.
Special Add-ins for Mother’s Day Cakes
You can turn an ordinary cake into a Mother’s Day masterpiece with smart additions. Here’s a baker’s secret: instant coffee boosts chocolate’s flavor in chocolate cakes without any coffee taste. Fresh berries, like strawberries or raspberries, create stunning spring celebration cakes. Lemon zest brightens everything up, and edible flowers add beautiful decorative touches.
Buttermilk keeps things moist, mayonnaise adds richness, and olive oil creates unique flavors. Think about mom’s favorites—maybe coconut for tropical vibes or fresh cream for classic charm.
Must-Have Baking Tools for Success
Good tools make better cakes. Measuring cups and spoons keep things precise, but a digital food scale gives you spot-on accuracy. Quality cake pans are the foundation—8 or 9-inch rounds work for layer cakes, while 9×13-inch rectangular pans suit sheet cakes perfectly. A reliable mixer, whether stand or handheld, makes your work much easier.
A wire cooling rack prevents soggy bottoms, parchment paper helps cakes release cleanly, and an offset spatula smooths frosting beautifully. A simple cake turntable and bench scraper help create professional-looking finishes without special training.
Step-by-Step Baking Process
Your Mother’s Day cake’s success depends on how well you handle the baking process. Simple ingredients become a memorable treat when you use proven techniques at each step.
Preparing Your Workspace and Ingredients
A well-organized workspace makes baking stress-free. Set up a dedicated baking station where everything stays within reach. Dry ingredients should go on one side of your counter and wet ingredients on another to avoid mix-ups. Professional bakers measure all ingredients before mixing—they call this “mise en place” or “everything in its place.”
Butter, eggs, and milk blend naturally at room temperature, which makes them significant ingredients. Take them out of the refrigerator 30 minutes before you start. Your measuring cups, spoons, mixing bowls, and pans should be ready too, so you won’t need to scramble mid-recipe.
Mixing Techniques for Perfect Cake Batter
Your cake’s final texture depends heavily on the mixing method you choose:
- Creaming method: Beat soft butter and sugar until light and fluffy (3-5 minutes). Add eggs one at a time, then alternate between dry ingredients and liquids.
- Reverse creaming: Mix dry ingredients first. Cut in butter until the mixture looks like sand, then add wet ingredients—this works best for tiered cakes with a tighter crumb.
- Blending method: Combine wet and dry ingredients—perfect for oil-based cakes like carrot cake.
Whatever method you pick, don’t overmix once you’ve added flour. Too much mixing develops gluten that could make your cake tough.
Baking Times and Temperature Guidelines
Layer cakes bake best at 350°F (177°C), while pound cakes might need 325°F (163°C) to bake evenly. The oven rack should sit in the middle for even heat distribution.
A toothpick inserted in the center should come out clean or with a few moist crumbs to test doneness. Your cake might bake unevenly if you open the oven door too often because the temperature fluctuates.
Cooling Methods That Prevent Cracking
Let your cake rest in the pan for 10-15 minutes after baking before moving it to a cooling rack. This cooling period helps the cake set properly and prevents breaks. The cake cools faster when you remove it from the pan after this rest period and place it directly on a wire rack.
Your Mother’s Day special cake needs patience during cooling to prevent cracks. A well-cooled cake makes frosting and decorating easier, ensuring your creation looks as amazing as it tastes.
Decorating Your Mother’s Day Special Cake
Your perfectly baked cake awaits its final creative touch—a beautiful transformation that will make Mom’s special day even more memorable.
Simple Frosting Techniques for Beginners
Learning simple frosting methods helps create impressive results even when you’re new to baking. A thin “crumb coat” seals in stray crumbs. Let it chill for 15-20 minutes before applying your final layer. Your metal bench scraper or offset spatula should be warmed in hot water between strokes for smooth finishes. You can create textured designs by pulling your spatula in short strokes over thickly-iced sides—any little imperfections add to the charm! Naked cakes with minimal exterior frosting give an elegant, rustic look that shows off your layers beautifully.
Adding Personal Touches with Mom’s Favorite Colors
Your mother’s day cake becomes extra special when you add personal touches that go beyond standard celebration. Her preferred color palette should shine through, whether she loves pastels or bold hues. The large star tip like Ateco 848 helps even beginners pipe beautiful rosettes or swirls. You can create colored patterns by piping dots of buttercream and spreading them with a small spatula for a “pulled dot” effect. Her hobbies or interests can inspire your design—garden-themed decorations work great for plant lovers, while simple lettering shows your appreciation.
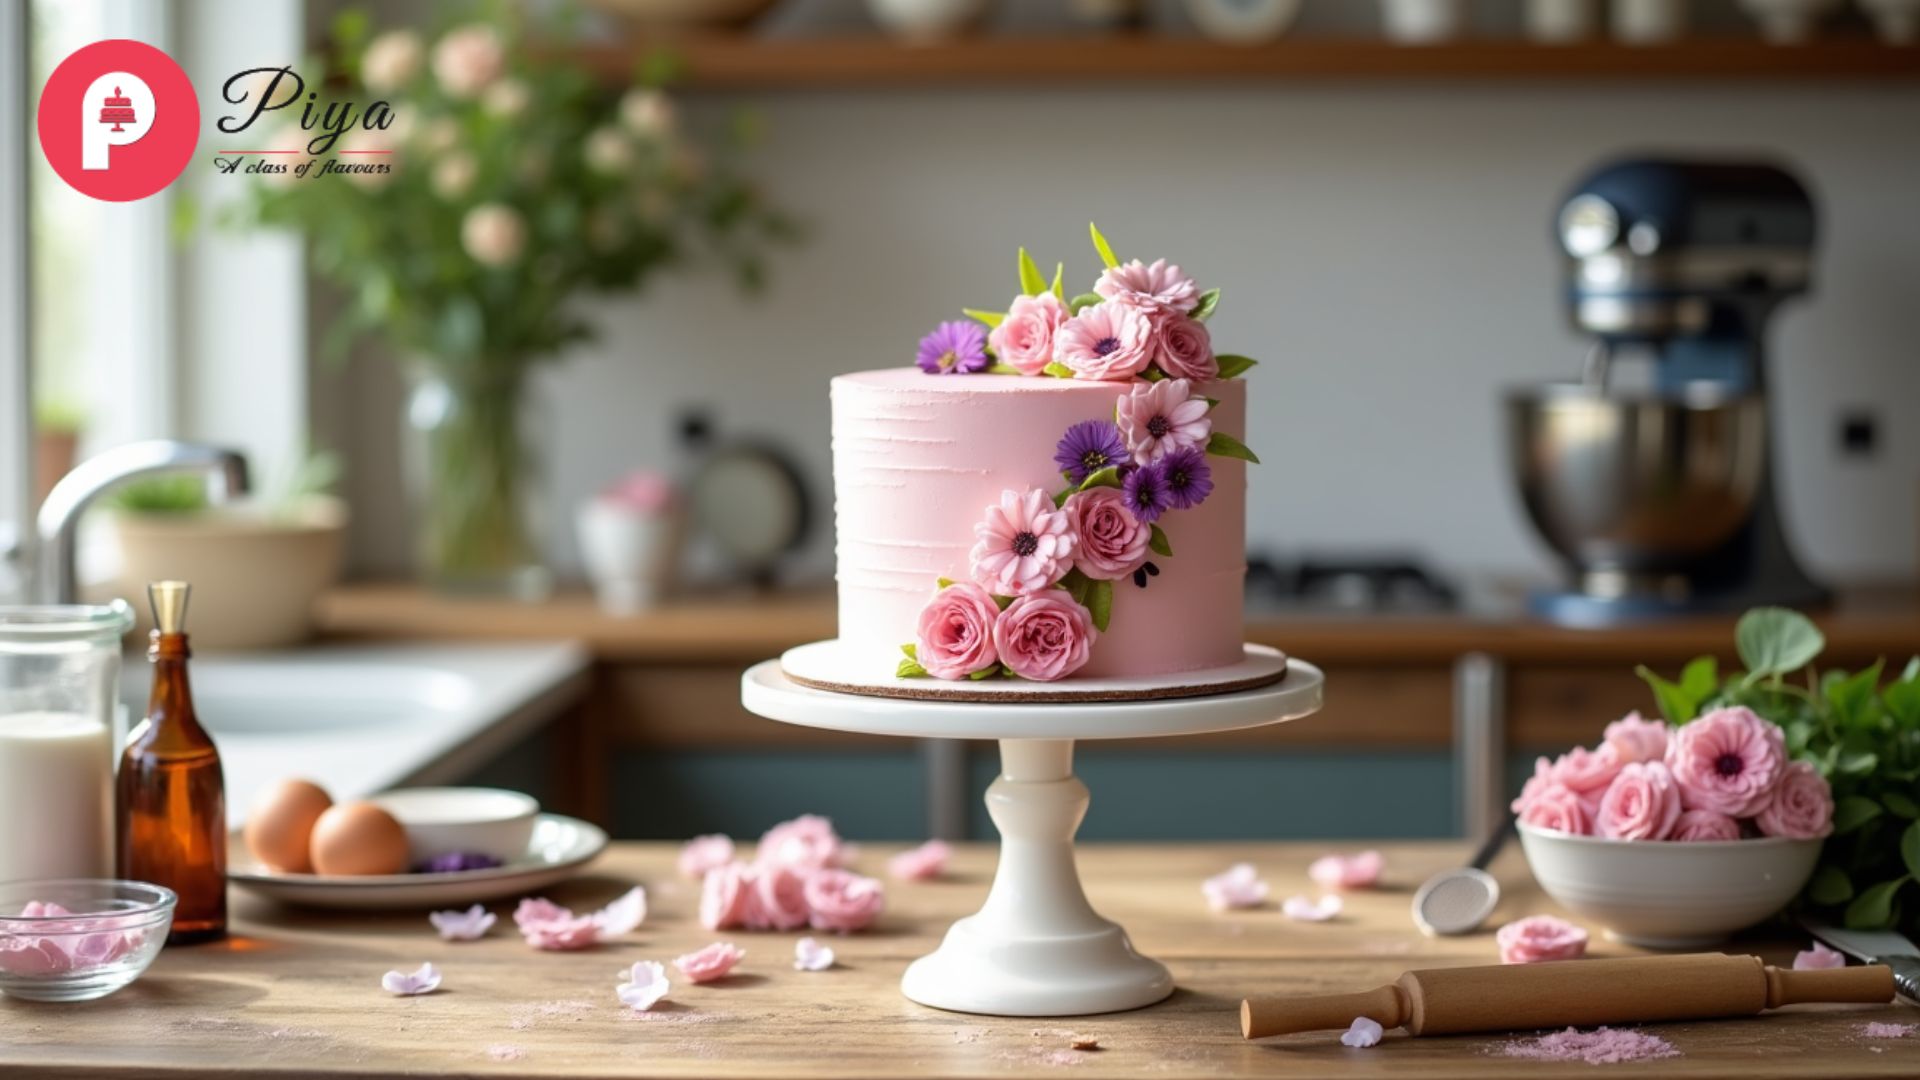
Edible Flower Decorations for Elegant Cakes
Edible flowers can turn a mother’s day cake into a stunning centerpiece. Here are some safe, completely edible options:
- Nasturtiums, pansies, and violets (mild flavor)
- Rose petals and lilacs (classic floral notes)
- Flowering herbs like thyme or rosemary (subtle herbal touch)
Use only organic, pesticide-free blooms that are labeled as food-grade. Grocery store bouquet flowers contain harmful chemicals and should never be used. The flowers should be placed just before serving since some varieties wilt quickly at room temperature. You can make them last longer by candying them—brush with beaten egg white and sprinkle with superfine sugar. This preserves their beauty and softens stronger flavors.
Conclusion
Making a special Mother’s Day cake definitely needs careful planning, proper ingredients, and attention to detail. A cake made with love becomes a memorable way to show appreciation since most mothers value handmade gifts.
The recipe for success starts with understanding your mother’s priorities, using quality ingredients and mastering proper baking techniques. A properly planned timeline helps you execute each step carefully – from measuring ingredients to adding final decorative touches.
Your thoughtful effort will make this Mother’s Day cake truly special, not professional-level skills. Simple buttercream swirls or elegant edible flowers can both create a beautiful result.
Get your ingredients ready, prepare your workspace and start baking confidently. Your mother will cherish the time, effort and love you put into making her special day sweeter.