Cotton candy at room temperature starts drooping within just one hour. This quirky fact makes the carnival treat quite challenging to preserve.
The good news? We found a way to capture that magical cotton candy experience in a cake that lasts much longer. Simple ingredients like cake flour, butter, and natural cotton candy flavoring come together to create a kid’s dream dessert that tastes just like childhood.
This cake delivers the perfect cotton candy flavor in every bite, making it ideal for whimsical birthday parties or nostalgic baby showers. The magic comes from carefully combining natural ingredients and precise timing – especially when you add the actual cotton candy topping.
Want to create a showstopping dessert that brings together carnival charm and beautifully decorated cake elegance? Let’s take a closer look at our step-by-step recipe!
Essential Ingredients for Cotton Candy Cake
The perfect cotton candy cake comes alive with the right mix of ingredients. You can bring that nostalgic carnival flavor to your kitchen with a magical blend of components.
Best cake mix options
A white cake mix makes the perfect base because it won’t overpower the cotton candy flavoring. Cake flour gives you exceptionally light and fluffy layers that professional bakers love. The simple mixture needs 2½ cups of sifted cake flour mixed with exact amounts of baking powder and baking soda to rise perfectly.
Cotton candy flavoring types
Great cotton candy taste comes from picking the right flavoring. Natural cotton candy artisan flavors without preservatives give you the purest taste. On top of that, cotton candy extract works great in both cake batter and frosting – you’ll only need ¼ to ½ teaspoon per batch.
Want to try something different? Cotton candy soda can work as a flavoring agent. You can also use unsweetened cotton candy flavoring oil that lets you control sweetness better while making other flavors pop.
Required tools and equipment
Here’s what you need to make this fun dessert:
- Three 8-inch round cake pans or four 6-inch pans
- Stand mixer with paddle attachment
- Kitchen scale to measure precisely
- Piping tips to decorate
- Cake leveler or serrated knife
The right tools help you get consistent results every time. A kitchen scale helps you divide the batter perfectly – about 11-12 ounces for 6-inch pans or 15-16 ounces for 8-inch pans.
Room temperature ingredients are vital to get the texture just right. Your buttermilk, egg whites, and butter should sit at room temperature before you start mixing. Full-fat ingredients will give you better flavor and texture in your finished cake.
Gel food coloring works better than liquid ones because it gives strong colors without making the batter runny. Parchment paper and non-stick spray will help your cake layers slide out easily after baking.
How to Make Cotton Candy Cake From Scratch
A perfect cotton candy cake with delightful flavors needs careful attention and precise timing. These steps will give a light and fluffy creation that tastes amazing.
Preparing the cake batter
Your oven should be preheated to 350°F. The dry ingredients need to be mixed first – combine flour, baking powder, and salt in a large bowl. Beat butter and sugar together on medium-high speed for about 1 minute. The eggs and milk should be added next. Beat on high for another minute until everything combines well.
Adding cotton candy flavor
The cotton candy flavoring needs careful incorporation – Lorann Cotton Candy Flavoring works better than other brands. Split the batter into separate bowls to add colors. Pink food gel goes into one portion and blue into another. Stir gently to keep the proper texture. The colored batters should be spooned alternately into prepared pans to create a beautiful marbled effect.
Baking temperature and timing
The batter goes into greased 9-inch cake pans lined with parchment paper. Baking takes 20-23 minutes in 8-inch pans. Similar timing works for 6-inch pans but they need closer monitoring. You’ll know the cake is ready when a toothpick comes out clean or shows just a few moist crumbs.
Cooling and leveling tips
Let the cakes rest in their pans for 10 minutes after baking. They should then be moved carefully to a wire rack until completely cool. Each layer can be leveled using a cake leveler or serrated knife once cooled.
Pro Tips:
- The batter can be made ahead and kept in the fridge for up to two days
- Refrigerated batter should reach room temperature (about 30 minutes) before baking
- Gentle mixing prevents texture issues when adding food coloring
- Fresh baking powder helps the cake rise properly
- Dry cakes usually mean measurement or mixing problems
An airtight container keeps the cake fresh for 5-7 days. Room temperature ingredients will give the best results.
Perfect Cotton Candy Frosting Guide
A perfect cotton candy cake depends on becoming skilled at making its signature frosting. The right technique and ingredients will help you create a buttercream that brings back memories of carnival cotton candy.
Choosing the right buttercream base
Swiss meringue buttercream gives you the best texture and stability for cotton candy cake. You’ll need 9 large egg whites and 2 cups granulated sugar, heated together in a water bath until the sugar dissolves. Whip the mixture to stiff peaks, then add 4 sticks of unsalted butter slowly to achieve a silky-smooth finish.
Russian buttercream stands out as an egg-free option with similar smoothness. This version combines butter with sweetened condensed milk and eliminates the grittiness you often find in traditional American buttercream.
Classic American buttercream works great as a quick option. Mix 3 sticks of softened salted butter with 7½ cups confectioners’ sugar and 8-12 tablespoons heavy cream. The cotton candy flavoring blends exceptionally well with this base.
Adding cotton candy extract
The authentic cotton candy taste comes from careful flavor incorporation. Begin with 1-2 drams of cotton candy flavoring oil and adjust based on your preferred intensity. Add vanilla extract and salt, then mix well to distribute evenly.
Pro Tips for Perfect Frosting:
- Use room temperature ingredients for smoother results
- Beat butter until it turns light and creamy (about 7 minutes)
- Add flavoring in small amounts to control the taste
- Check consistency as you go
These ratios work best:
- Standard buttercream: 1 tablespoon cotton candy flavoring per batch
- Swiss meringue: ¼ teaspoon salt plus 1 tablespoon vanilla
- Russian buttercream: Start with a few drops and adjust
Your frosting turns too runny? Pop it in the fridge for 10-15 minutes and whip again until fluffy. The flavoring seems too strong? Balance it out with small amounts of cream, powdered sugar, and butter.
Decorating Your Cotton Candy Cake
The most exciting part awaits – transforming your cotton candy cake into an artistic masterpiece. You’ll create a stunning decoration that captures everyone’s attention with the right techniques and timing.
Color swirl techniques
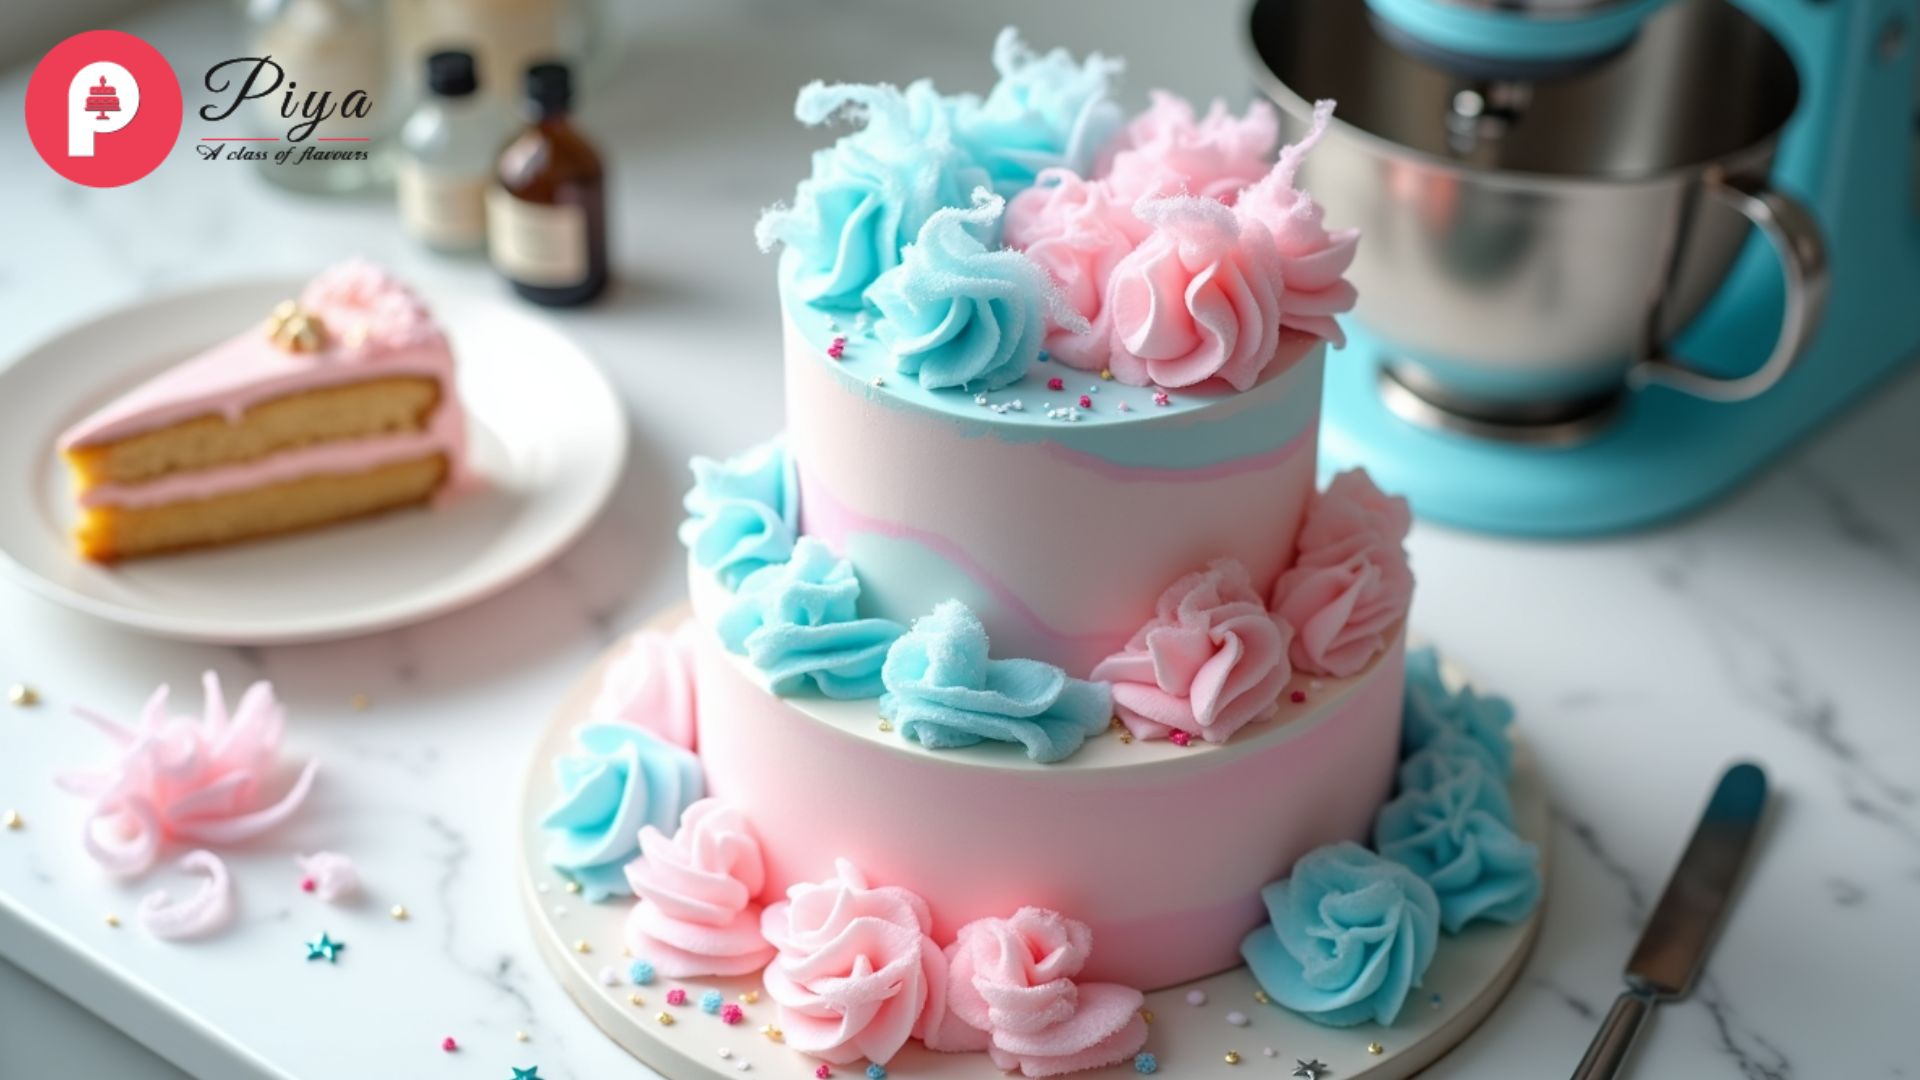
Start with a white buttercream base and chill it for 15 minutes until firm. Take a small offset spatula to randomly apply pink and blue buttercream dabs around the sides. The colors blend smoothly when you press a cake scraper against the sides while rotating the turntable. Your cake’s visual appeal improves when you add more colored buttercream to areas that need extra definition.
Adding real cotton candy
The timing is vital when you work with real cotton candy. This delicate garnish should go on just before serving since it starts to droop within an hour at room temperature. Room moisture makes cotton candy deteriorate immediately, so never refrigerate these decorations.
Your presentation works best when you:
- Place cotton candy pieces strategically on top
- Let pieces naturally cascade down the sides
- Build varying heights that add dimension
- Match your frosting palette’s colors with the cotton candy
Sprinkle options
Carefully chosen sprinkles provide that perfect finishing touch. A typical cotton candy-themed sprinkle mix contains:
- Pink nonpareils
- Blue sugar crystals
- Purple jimmies
- Flavored sugar chunks
The cake should sit over a baking sheet to catch excess pieces while you apply sprinkles. Take a handful of sprinkles and press them gently into fresh icing around the bottom third of the cake. Professional results come from tossing additional sprinkles toward the top that create a natural gradient effect.
The cake’s visual appeal improves with decorative buttercream swirls. Use tip #827 to pipe eight evenly spaced flourishes around the top edge. These swirls not only look beautiful but also serve as perfect anchoring points for extra cotton candy pieces or matching macarons.
Keep decorated cakes (without cotton candy) in a cool, dry spot away from direct sunlight that prevents color fading. Take photos of your creation right after adding cotton candy to capture its full beauty before any natural deflation occurs.
Conclusion
A perfect cotton candy cake definitely needs attention to detail. These techniques will reward you with an unforgettable dessert when you master them. Room temperature ingredients, natural cotton candy flavoring, and proper timing are the life-blood of this magical creation.
Real cotton candy decorations should be added at the last minute to ensure your cake keeps its whimsical appearance throughout your special event. Your creation’s beauty will stay preserved until serving time if you store it away from moisture and direct sunlight.
You now have the knowledge to craft this showstopping dessert with these expert tips and techniques. Your guests will travel back to carefree carnival days with each bite while they appreciate the sophistication of a beautifully decorated cake. The cotton candy cake will become the centerpiece of countless celebrations as you start baking and experiment with colors and decorations.